How to use a Gantt chart
- Determine tasks and subtasks.
- Identify task connections.
- Create a timeline.
- Order tasks.
- Build your Gantt chart.
- Assign tasks, resources, and progress to team members.
- Chart your progress.
A big project just landed on your plate, and it is up to you to make sure it goes off without a hitch. But that’s easier said than done. You have to assign tasks, plan a timeline, and make sure everyone and everything stays on track. To accomplish this, you decide to use a Gantt chart.
Gantt charts for project management display tasks over time, creating a visual roadmap of the project’s progress. Gantt charts make it easy to:
- Visualize the entire project from start to finish.
- Improve time management.
- Clearly communicate with your team.
- Increase transparency on the project’s progress.
- Promote accountability and task responsibility.
- Avoid overloading team members.
Now that you know the importance of Gantt charts for project management, it's time to put it to the test. But before diving headfirst into Gantt charts, templates, and spreadsheets, there is a lot of information you need to gather. Follow these seven key steps to learn how to use a Gantt chart.
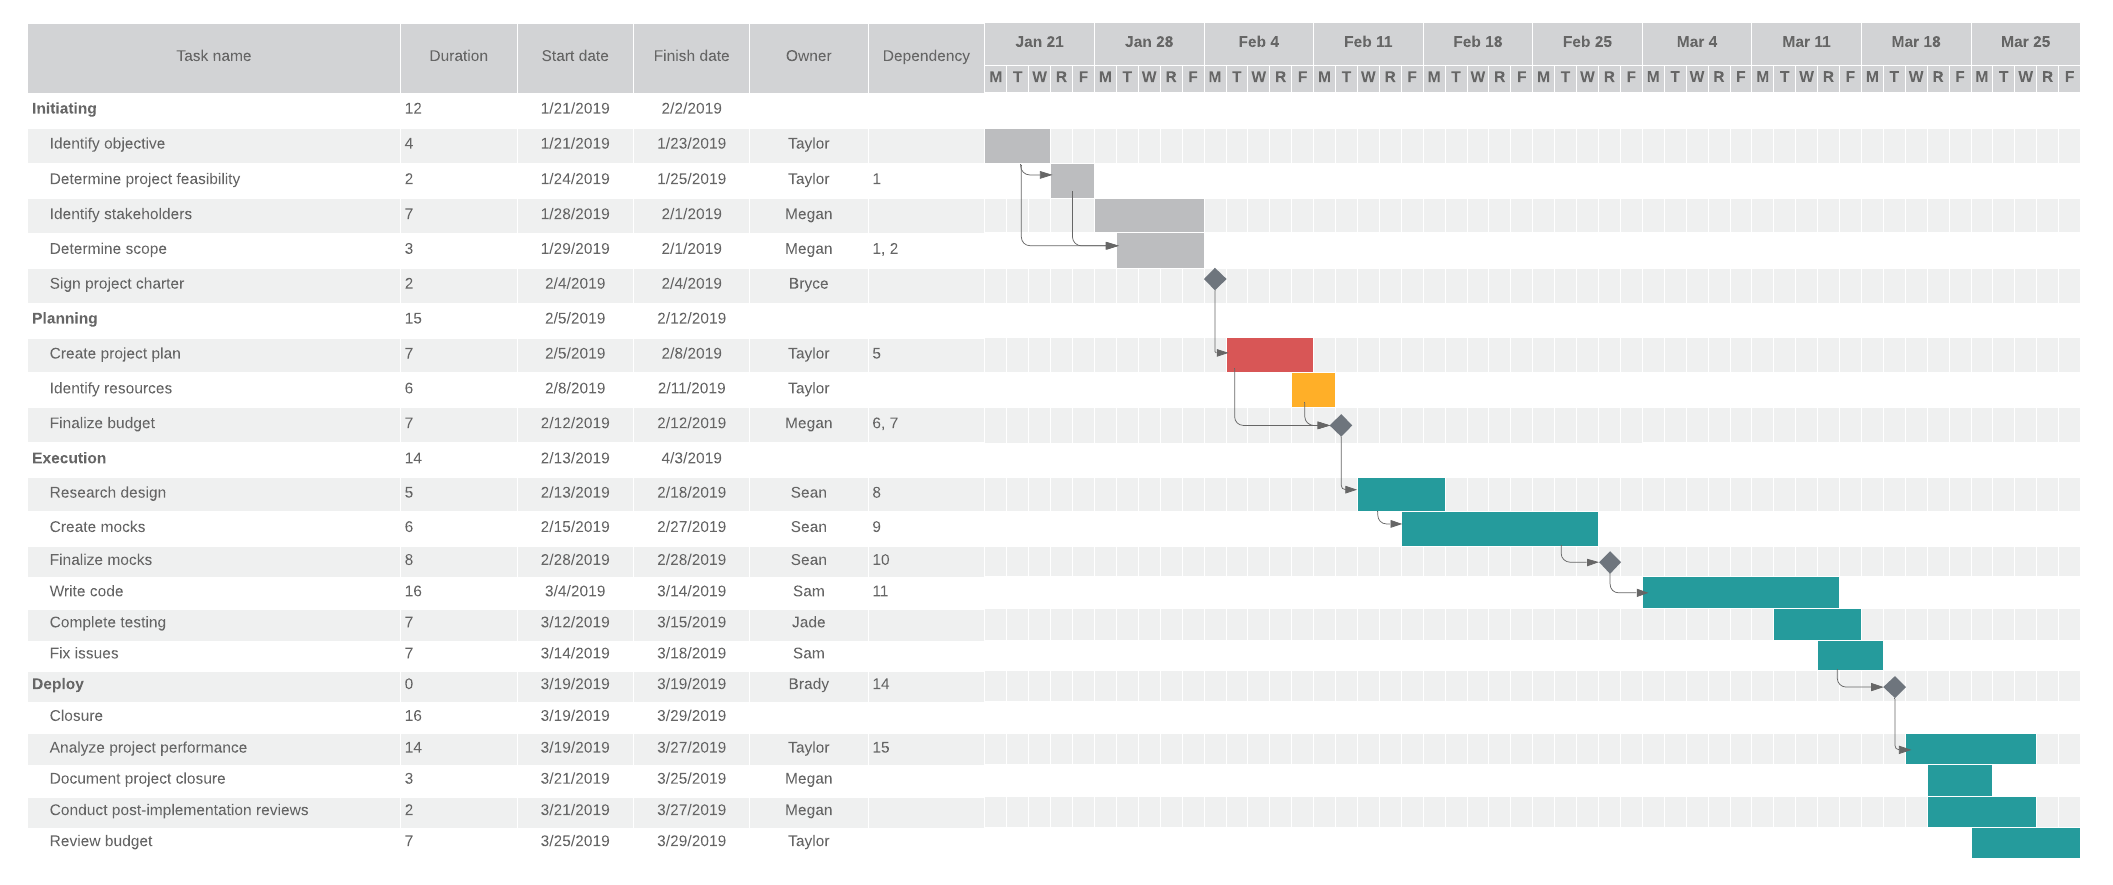
1. Determine tasks and subtasks
This first step takes the most time—but it’s also the most important. To create effective and accurate Gantt charts, you need all of the pertinent information at the start of the project. So project managers need to proactively think about each and every step needed to complete the project before it even begins. That’s a lot!
Trying to scope a project without this information is like knowing the best way to fit all the puzzle pieces together while they’re still in the box. If a piece is overlooked or forgotten, the picture will be incomplete.
For example, imagine the project you were assigned was to build and deploy a new product. Numerous steps, from identifying objectives and determining the scope to finalizing the budget and writing code, are critical to the product’s success. If you miss a key step, the project won’t be completed on time, potentially missing stakeholder’s deadlines.
A good way to get started is with a work breakdown structure that takes large projects and separates them into smaller, more manageable pieces. Using work breakdown structures helps you focus on milestones and the tasks needed to achieve them.
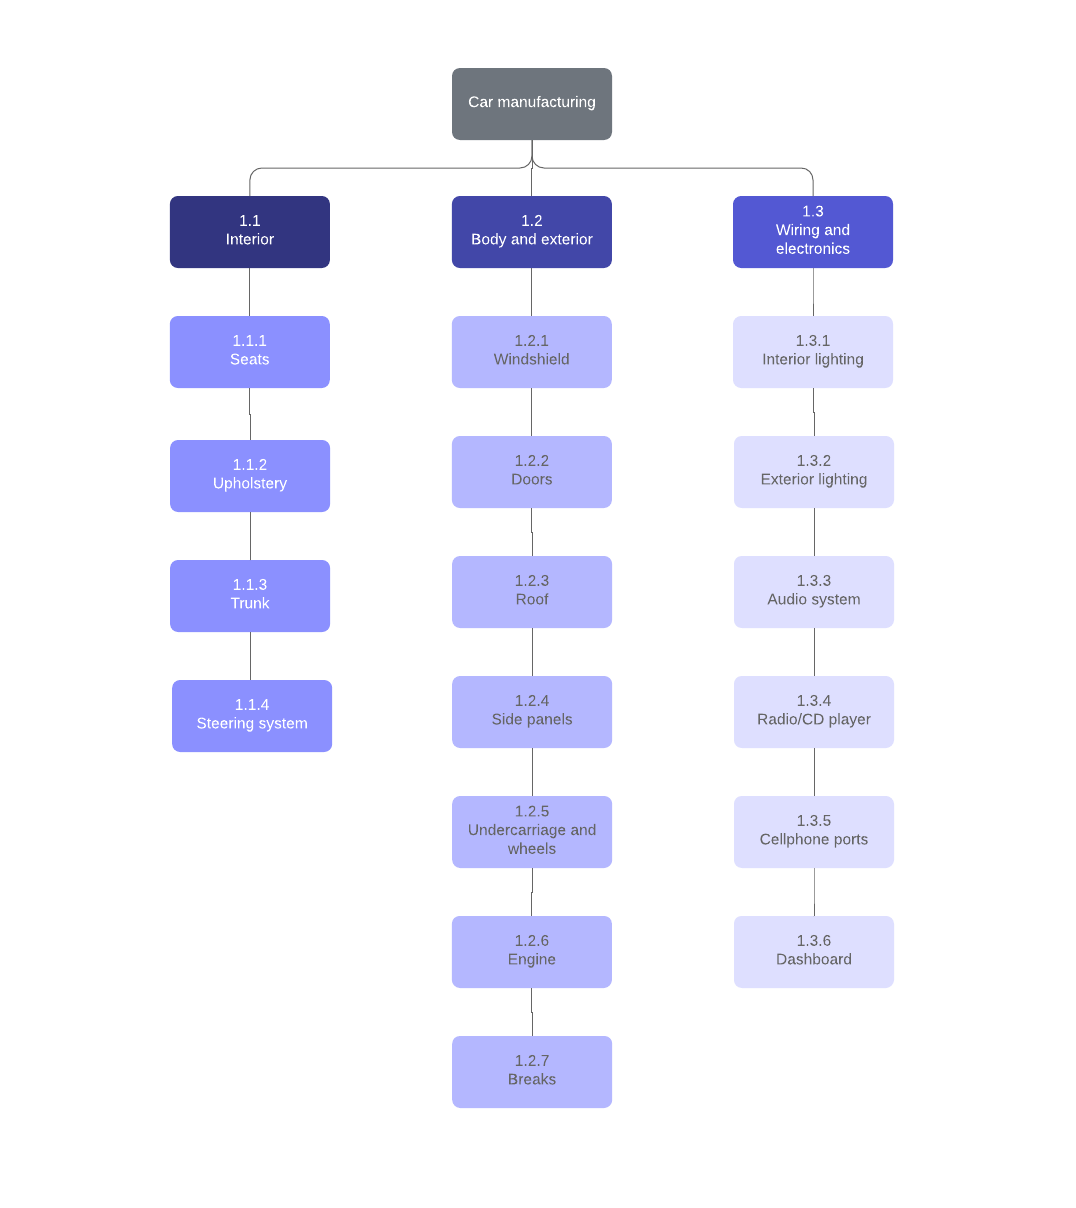
2. Identify task connections
The next step is to determine how each task is connected to one another.
Throughout the course of the project, some tasks will be dependent on others. It is important to understand the effect of task interdependencies on the project’s status since this information will determine which tasks must be completed before others can begin and which can be worked on at the same time.
Learn more about different types of tasks with this Gantt chart terminology:
- Parallel tasks: Can be worked on at the same time as other tasks. If possible, have as many parallel tasks as you can to save time and keep the project moving forward.
- Sequential tasks: Linear and need to be performed in a specific order.
- Finish to start: Tasks cannot be started until a previous task is completed.
- Start to start: Tasks cannot begin until a preceding task begins.
- Finish to finish: Tasks that cannot be completed until another task ends.
Tasks can be both parallel and sequential. For example, it is possible to identify key stakeholders and determine the project’s scope at the same time. However, the first milestone—signing the project charter—cannot be completed until the stakeholders are identified and the project is scoped.
3. Create a timeline
Half of a Gantt chart is the project tasks—and the other half is the timeline. Much like step one, allocating the appropriate amount of time to complete each step is integral to an accurate Gantt chart.
Be realistic and consider setbacks and delays. While getting a project done quickly seems like the best option, unrealistic timelines can slow the project down, give inaccurate expectations, make the team miss deadlines, cause unnecessary stress, and in some cases, even get the project canceled.
Building a productive, well-thought-out timeline gives you, your team, and your stakeholders a clear vision of the project’s progress.
To create a Timeline for your project, refer to this post about creating Timelines in Lucidspark, or use this project timeline below.
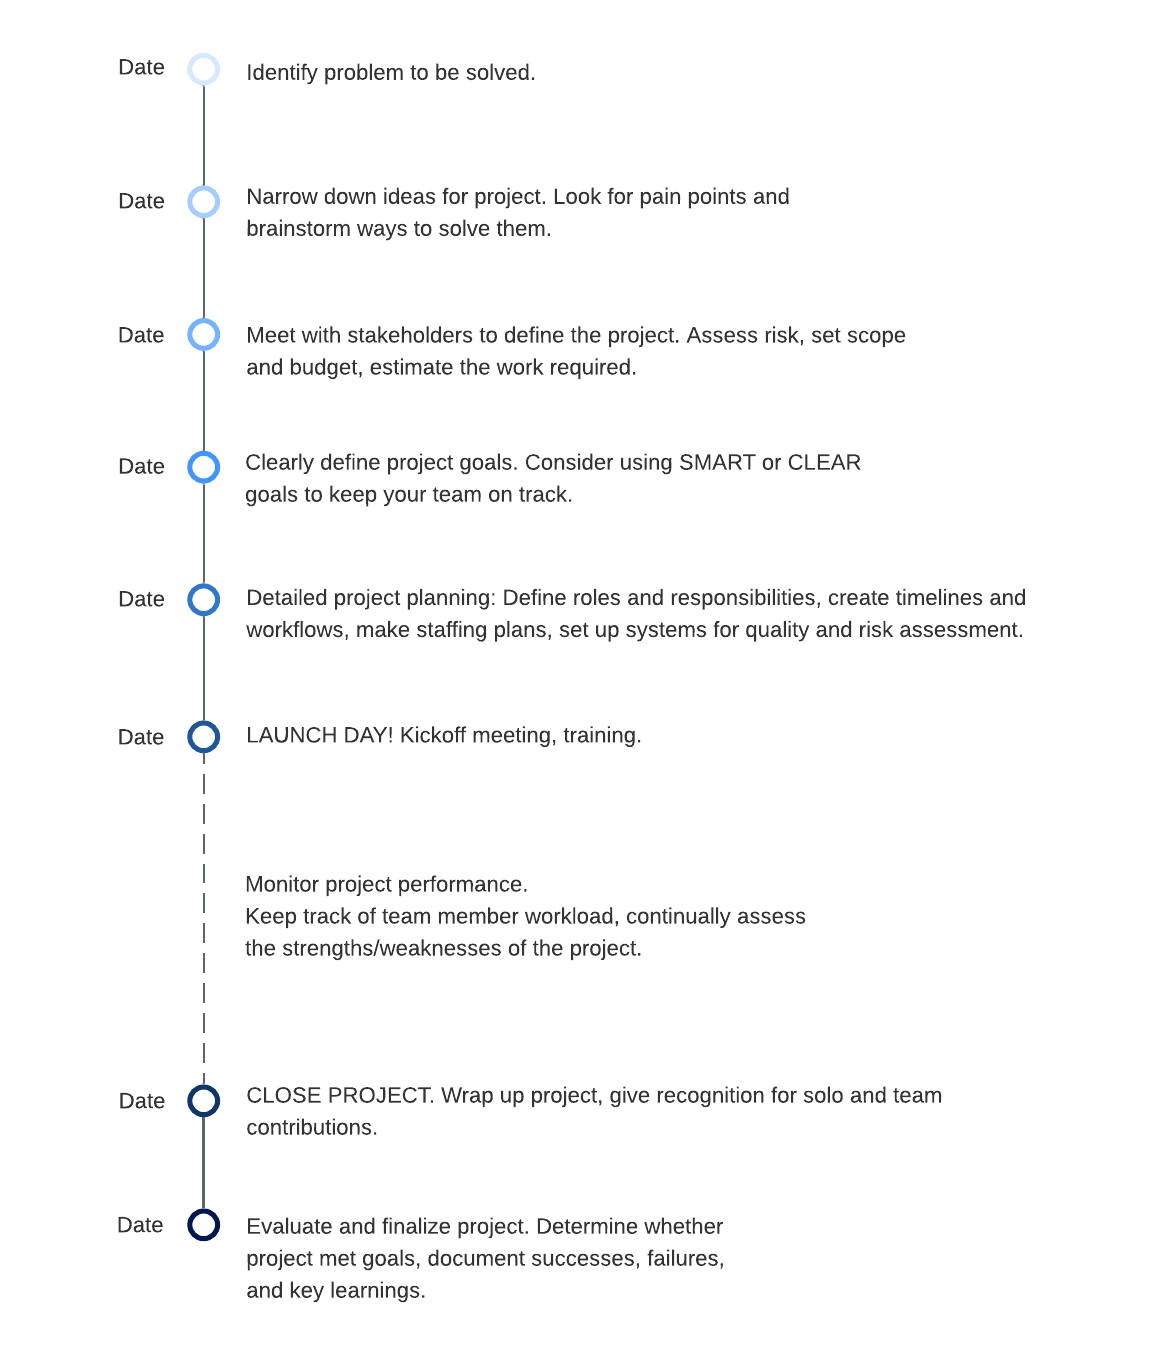
Let’s go back to the example of building and launching a new product. Writing the code is going to take considerably more time to complete than creating and finalizing the budget. As the project manager, if you don’t give your engineers enough time, the tasks that rely on the code, such as QA testing, are delayed so the team potentially misses key milestones and deadlines.
List each task you need for the project and note which tasks are reliant on others.
Alternatively, project managers use PERT charts to show task interdependencies before beginning a project. See how PERT charts compare to Gantt charts.
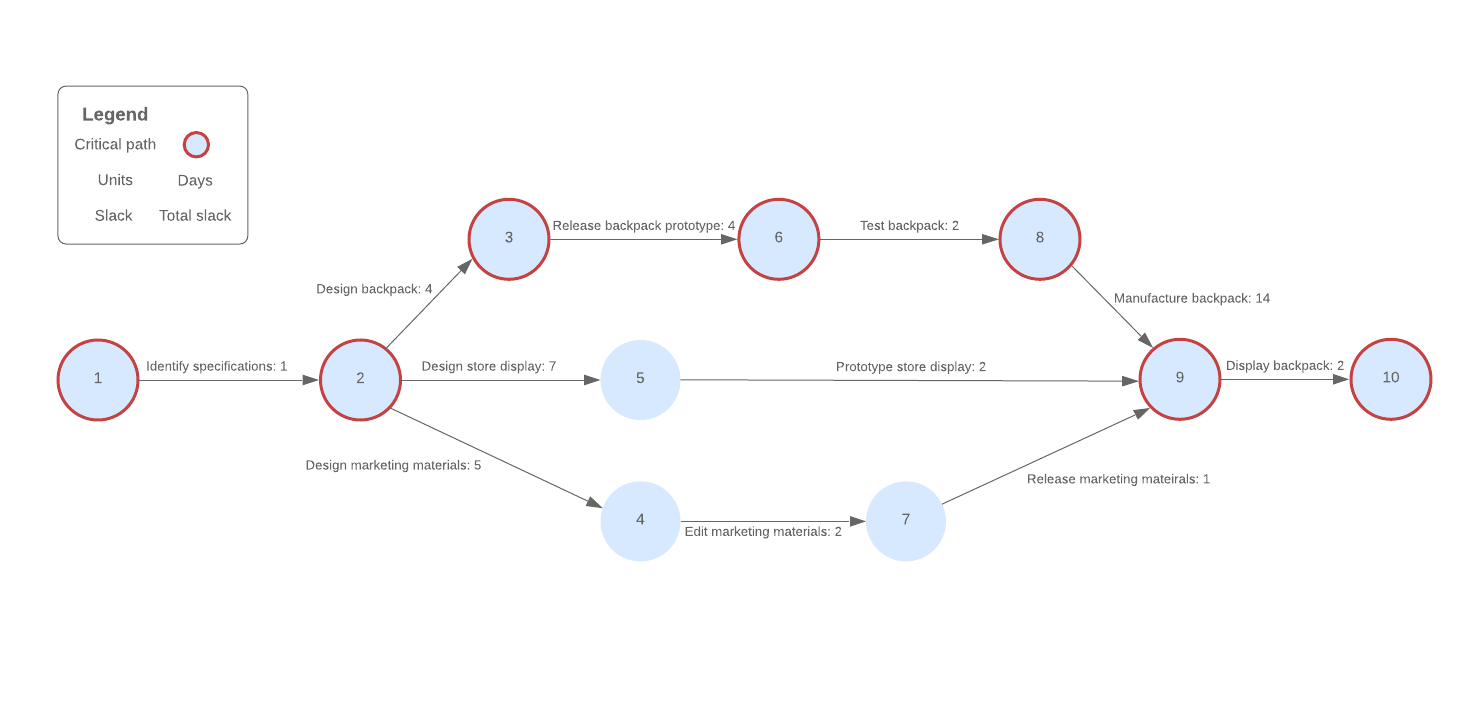
4. Order tasks
Now it is time to organize the tasks in the correct order.
This step is more than creating a first, second, and third to-do list. Successful Gantt charts incorporate the time it takes to complete each task with the way that each task is related to one another to create a comprehensive and realistic map of the project.
Begin by listing each task, the time it takes to complete each task, and task relationships. If you created a PERT chart in the previous step to show task relationships, whip it out for help organizing your tasks in the right order.
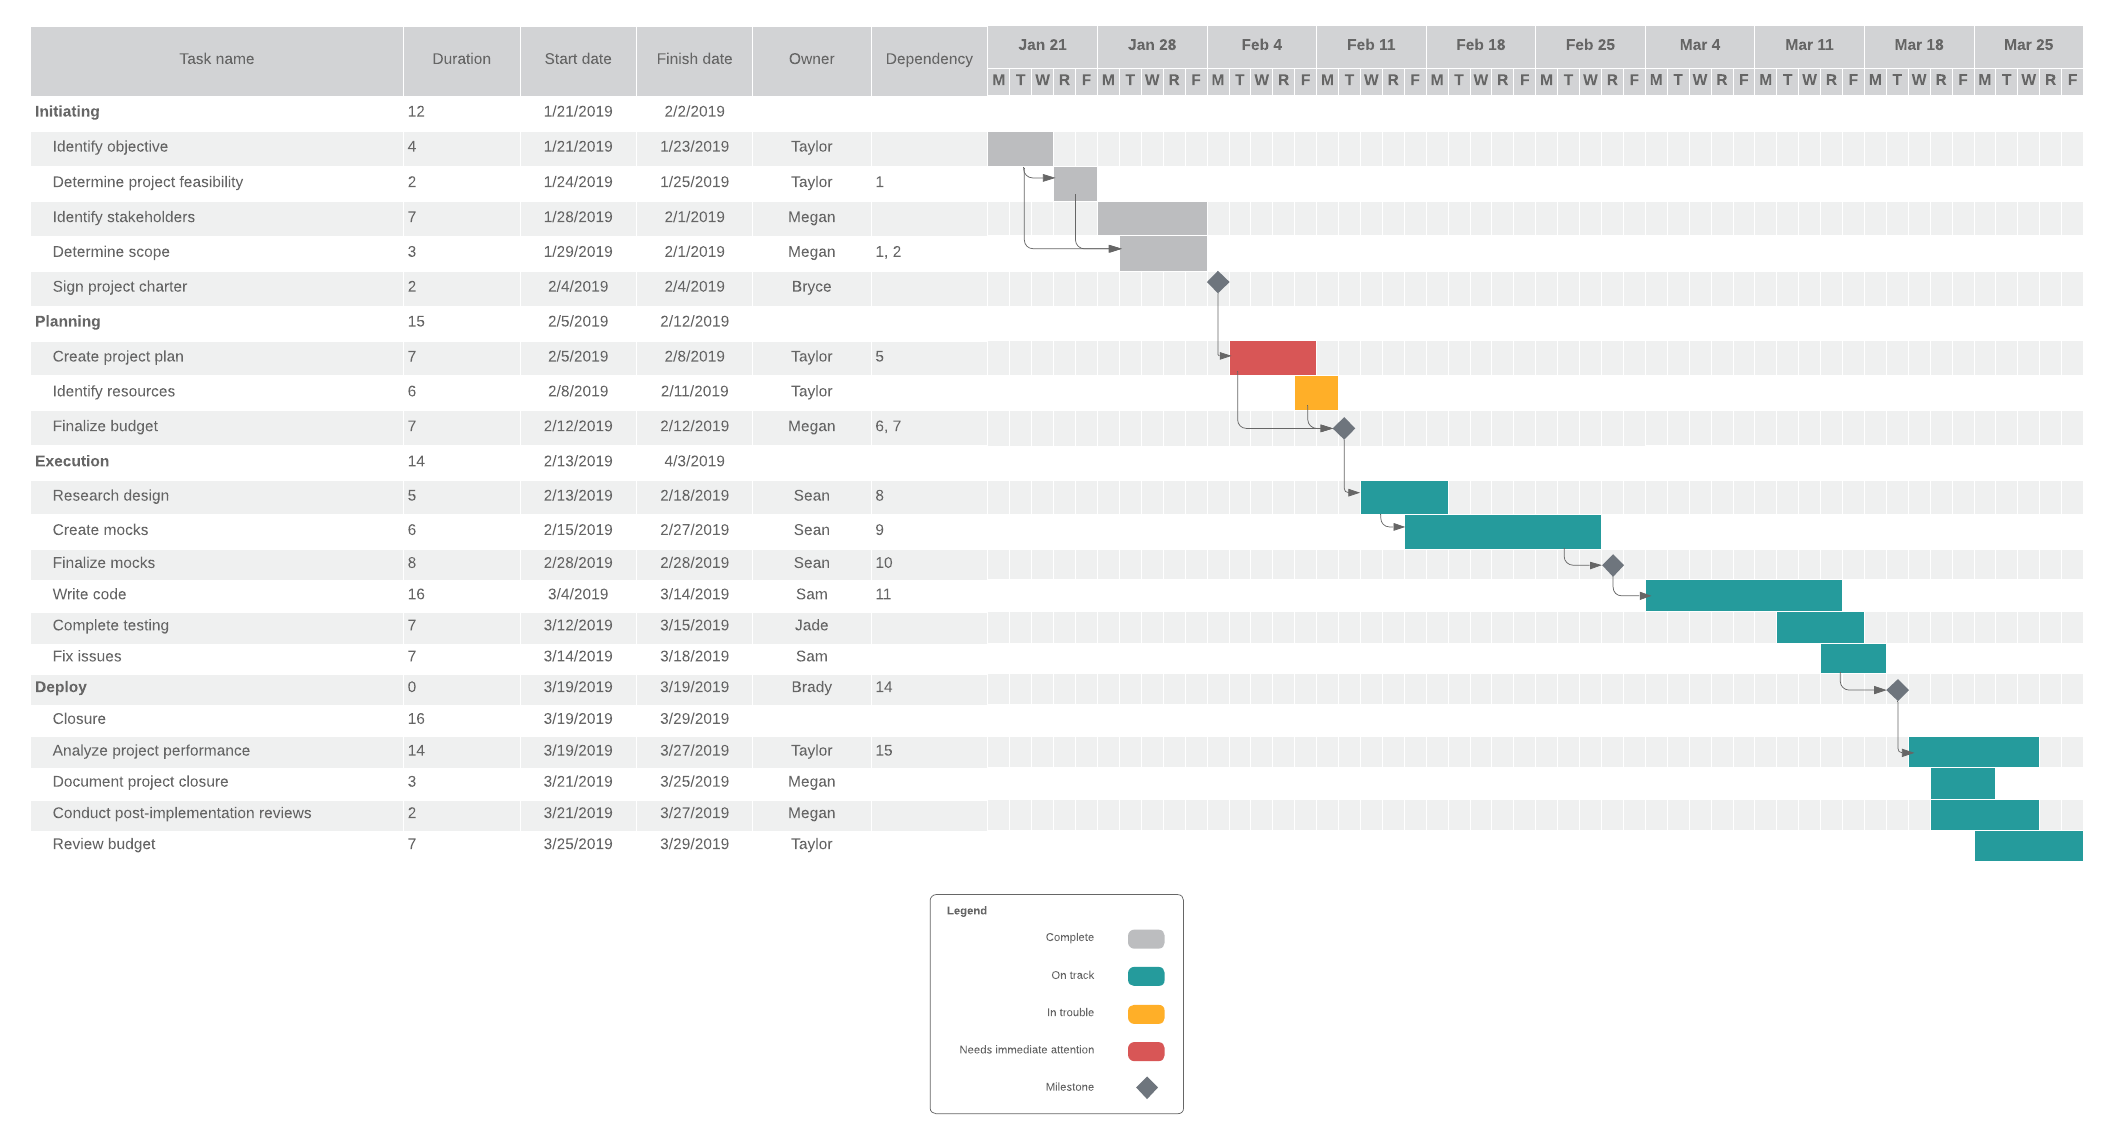
Here is our example of the new product launch after completing steps one through four:

5. Build your Gantt chart in Lucidchart
This is it! Now that you know how to use a Gantt chart, you’re ready to start building your own.
Whether you are new to Gantt charts or a seasoned project manager looking to save time, Lucidchart’s Gantt chart templates are a great place to start. There are several types of Gantt chart templates to choose from, including basic templates that display the project with no extraneous information. Or maybe you need a more detailed template to give your team all of the information in one location.
Gantt chart examples
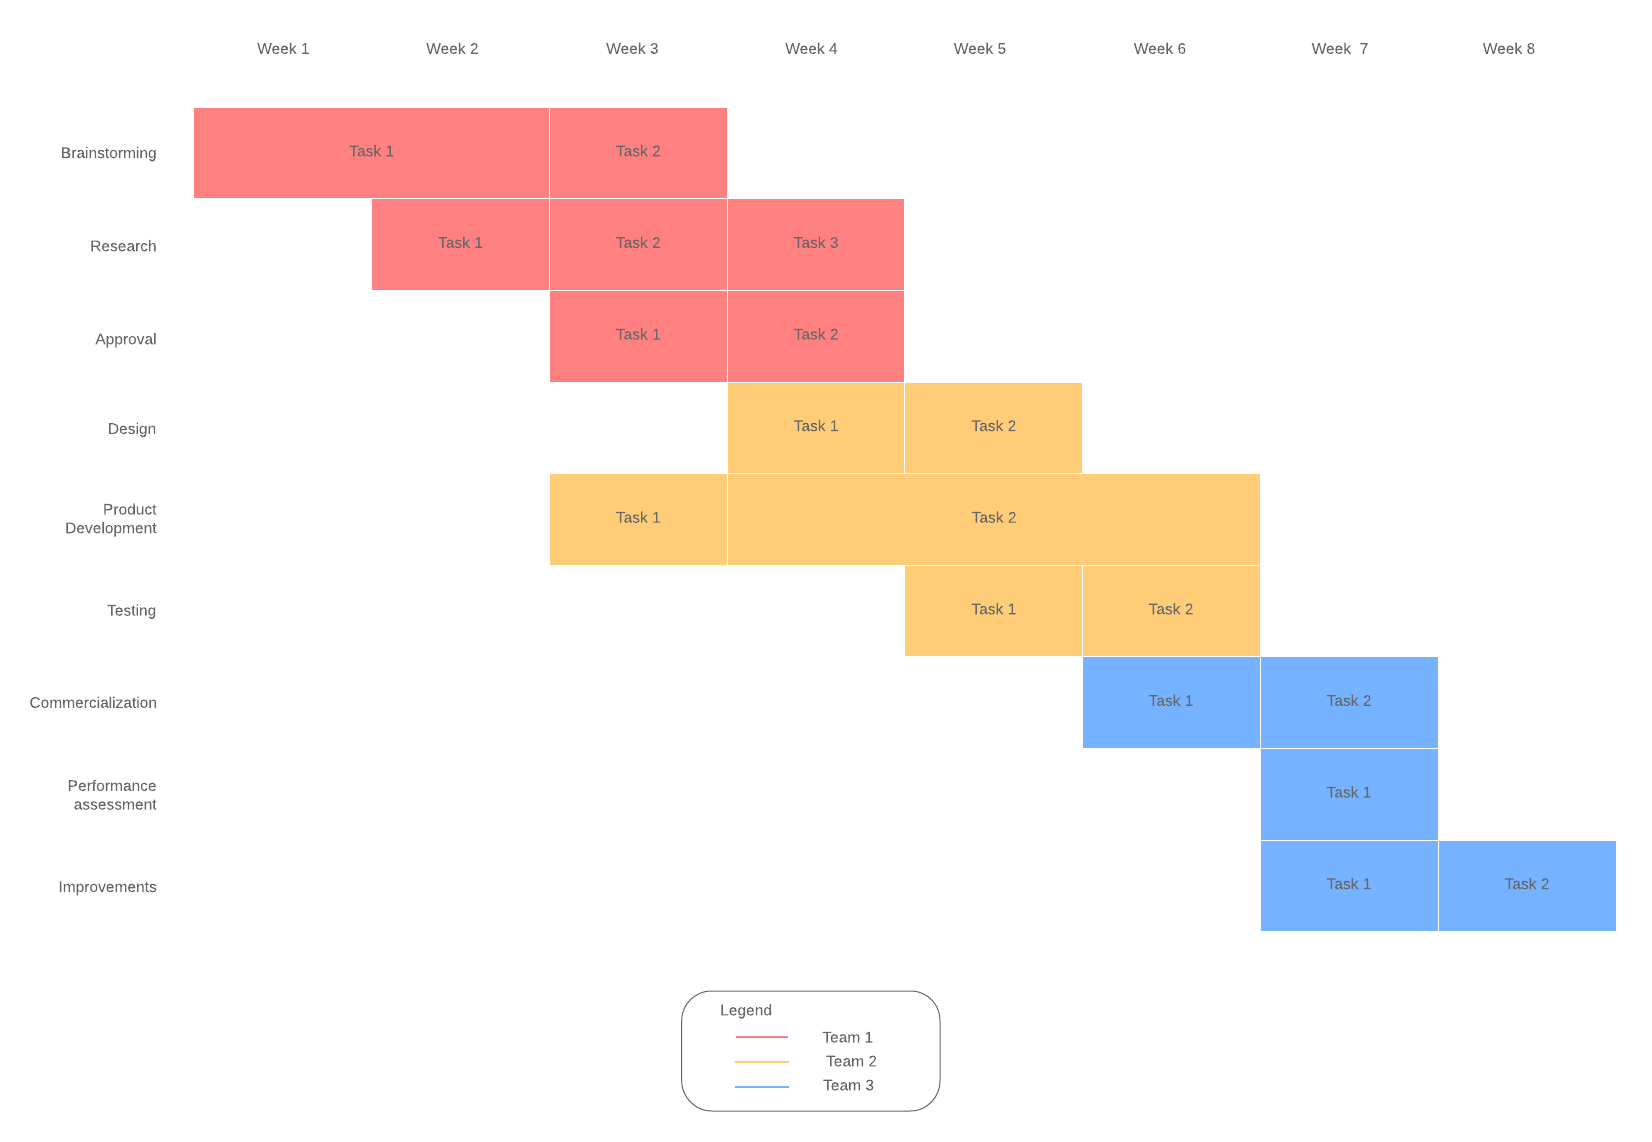
Basic template: Visualizes the entire project with no extraneous information
Detailed template: Provide your team with all of the information in one location
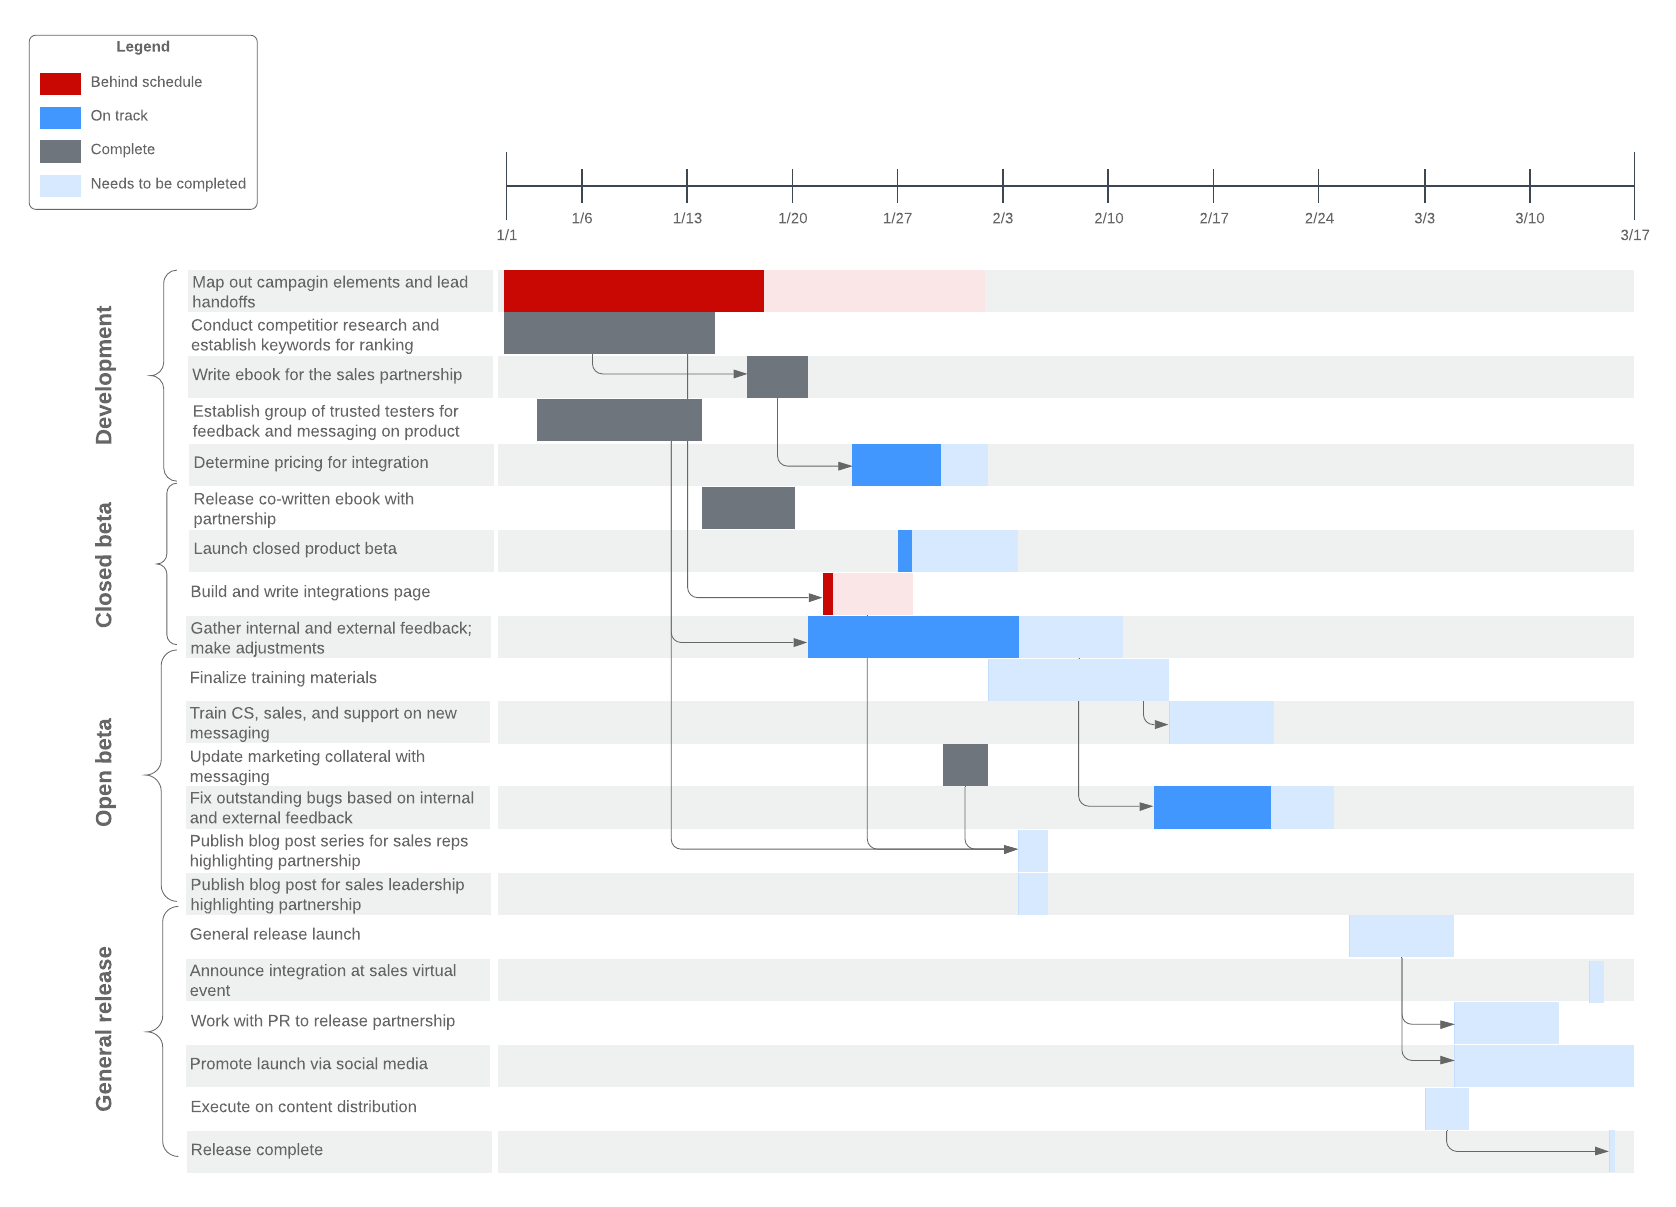
Progress bar template: Easily track your project's progress and stay on course
If you would rather start from scratch, Lucidchart makes the process easy and simple.
- Drag and drop tables and shapes to create the framework of your Gantt chart.
- Double-click inside shapes and lines to add text.
- Draw arrows to connect shapes and highlight task dependencies.
- Use colors to signal priority.
- Attach relevant links and information with the comment and note features.
Don’t forget to create a key for your Gantt chart to indicate what different colors, shapes, and arrows mean. For additional help in creating these visuals from scratch, learn how to make a Gantt chart in Excel.
Need to import data? No problem! Whether you are creating your own or using a Gantt chart template, Lucidchart integrates with Google Sheets and Excel to make importing data simple and easy.
6. Assign tasks, resources, and progress to team members
Once you have the Gantt chart ready to go, it's time to assign tasks and start the project.
With Lucidchart, you can share your Gantt chart template with your entire team in one location. Everyone can see task assignments, others’ progress, and potential parallel tasks that they could be working on.
When assigning tasks, link additional resources using the comment and note features in Lucidchart. These features will improve transparency and give team members all of the tools necessary to stay on track and meet their deadlines.
Lucidchart exists on the cloud so everyone has access to the exact same document as it updates in real time across all devices and platforms. If someone updates their progress in Lucidchart, everyone on the team can see the changes at the same time.
Clearly labeling who is designated to each task enables team members to visualize their role in the project and stay on schedule.
7. Chart your progress
The course is charted, the project is underway, and everyone is doing his or her part. You can use your Gantt chart to monitor the project��’s progress and evaluate your team’s work.
As the project moves forward, it will evolve and change. Update the chart as needed and be sure to assess the project along the way.
Gantt charts aren't set in stone—use them to your team’s advantage to strategically execute the project. Similar to creating the timeline, inflexible Gantt charts can cause stress, hinder performance, and throw the project off course. Adapting to necessary changes and reflecting those changes on the Gantt chart will keep the project moving forward.
Gantt charts make it easy to see the entire project: its timeline, all required tasks, and the team members assigned to each task.

Need something simpler? Explore Gantt chart alternatives.
Learn moreAbout Lucidchart
Lucidchart, a cloud-based intelligent diagramming application, is a core component of Lucid Software's Visual Collaboration Suite. This intuitive, cloud-based solution empowers teams to collaborate in real-time to build flowcharts, mockups, UML diagrams, customer journey maps, and more. Lucidchart propels teams forward to build the future faster. Lucid is proud to serve top businesses around the world, including customers such as Google, GE, and NBC Universal, and 99% of the Fortune 500. Lucid partners with industry leaders, including Google, Atlassian, and Microsoft. Since its founding, Lucid has received numerous awards for its products, business, and workplace culture. For more information, visit lucidchart.com.
Related articles
8 templates for project managers
In this blog post, we will share eight templates that project managers can use right now.
How to Make a Gantt Chart in Excel
Learn two approaches on how to make a Gantt chart in Excel with this complete step-by-step guide. Free templates included!
7 alternatives to Gantt charts
Gantt charts come with a series of fatal flaws that leave many managers looking for Gantt chart alternatives to meet their needs. Try these alternatives in Lucidchart. Templates included!
Advantages of PERT charts vs. Gantt charts
What's the difference between a PERT chart and a Gantt chart? Both of these tools can improve your project management processes. Learn when to use PERT and Gantt charts and how to create them.

